Meg and Brett had a couple of dressers they didn't want to junk, and which were getting no love anywhere. As I am keen on rescuing and refinishing furniture, they brought them to my garage and left them with me to do whatever I wanted.

They were both solid pieces of furniture and had lots of life left in them, but the thick, yellowed finish on the wood was showing them at their best.
I worked on both dressers on and off for weeks, and stripped them down to their bare bones.
It was very satisfying to use the carbide scraper to scratch away the old finish, and to slowly reveal the beautiful wood underneath.
As the varnish came off I moved on to using my Festool sander and some coarse grit sandpaper. I worked through the grits from 60 to 150 for the drawer fronts, and 220 for the main body.

I concentrated on the taller, four-drawer dresser, and brought it all the way down to bare wood.
This piece of furniture is decades old, and has travelled, so it was not in pristine condition. There were a few cracks and holes, and the drawers and slides needed attention. But it is solid wood, which means it is much easier to make everything good than it is on particleboard and laminate furniture.
So each slide was measured, and a replacement was cut to fit. Once each slide was replaced, I sanded down the outside of the drawers, and used Dixie Belle's Big Mama's Butta to rehydrate and refresh the wood.

Adding a good coat of that to the slides meant that the drawers now slide in and out smoothly.
Next came repairing the holes and splits.
Fortunately I have some large clamps, and so I was able to slightly pry the splits apart and add some wood glue.
Each part was then clamped tightly and left to allow the glue to set up properly.

A couple of the drawers also needed a little TLC and they got the same treatment.
The drawers are not dovetailed but are sturdy with a rebate.
The fronts are mainly strips of solid maple, and other blonde wood, laminated together to make a pretty grain pattern.
I had hoped to just top coat the drawers and top of the dresser, but there was an old knot hole in the top which meant that was not possible.

So I filled the hole, and the other odd holes in the body, and decided to paint the top and the body.
I love Fusion Mineral Paint. It applies so well, and self-levels. And I fell in love with the colour Ash when I went to the store to buy some.
Ash is a dark grey, with a subtle sheen.
With that decision, it was easy to decide to stain the wooden drawer fronts to make them look as dramatic as the body.
And then I put it all together and took a step back to really look at how everything was coming together.
The finish felt good with the smooth Fusion Mineral Paint, and the lightly sanded stain, but it still wasn't quite right, so I pulled out my Dixie Belle Hemp Oil and applied a good coat of that to all of the surfaces.

I put the handles back on without making any changes other than to clean them and give them a polish.
The original hardware was a thin brass, that had seen much better days, so out came the Rustoleum Flat Black, and the handles got a couple of coats.
Once they were properly dry, I put 3 coats of spray topcoat on to protect the paint finish.
I screwed them back on and they looked perfect!
The dresser looked great. Really great. But I felt something was still missing.

I felt that the drama of the pattern would be a lovely surprise for someone when they opened a drawer, and so I measured and cut a piece for each drawer.
Once I had attached the paper, the only thing left to do was hydrate the wooden sides inside the drawers with Dixie Belle's Big Mama's Butta, and buff it in well.
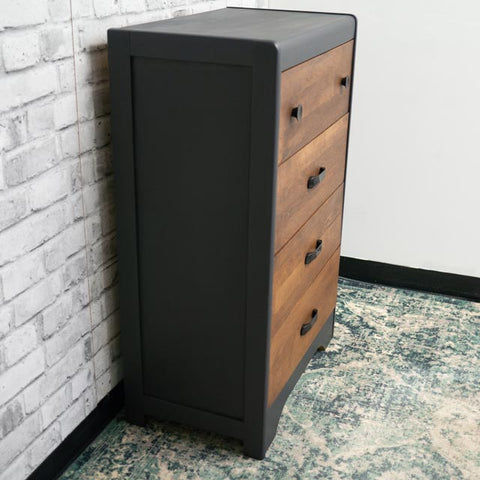
And now, with fits and starts, with making decisions and then changing them, and with so much enjoyment at working on an old, sturdy, well-made piece, the dresser is done.
Here are some photos of the finished dresser, and it is available to buy on our store:
 |
 |
 |
 |